Basic operations
The basic controls for the zBItx are present on top of the front panel display.
To change any control, select it by touching on it and use the tuning knob to change it’s value. For some functions, you can change the value by pressing on the button multiple times.
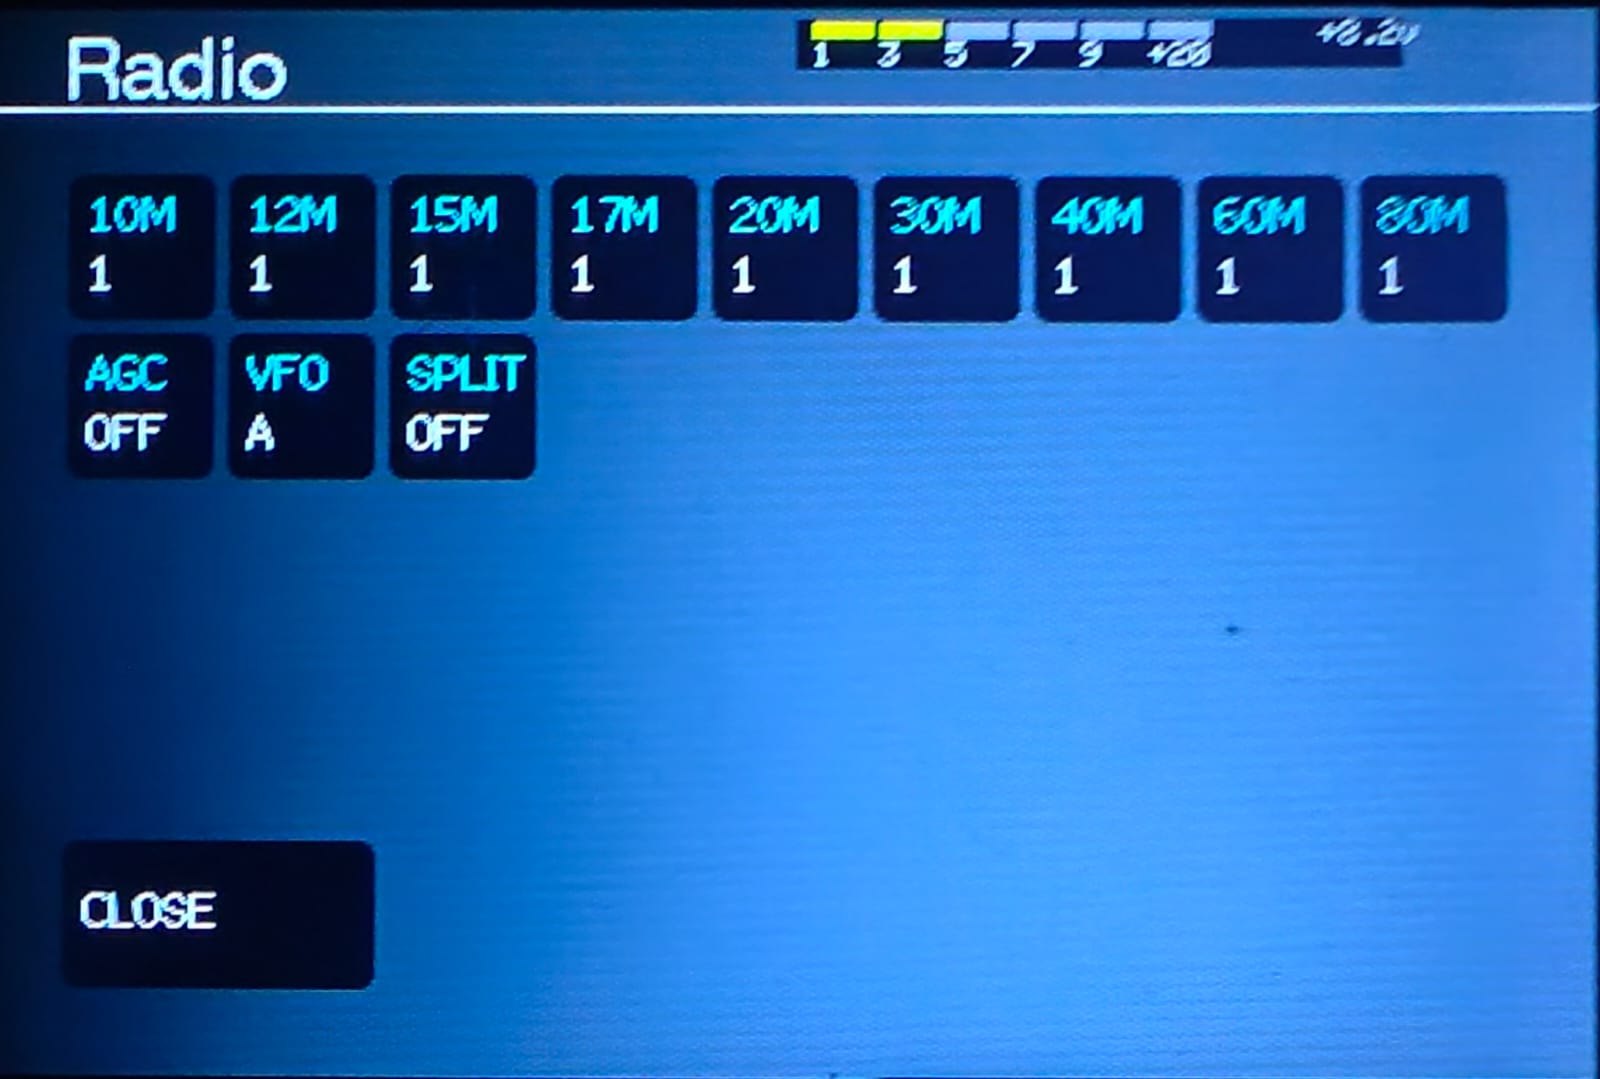
- The MENU button is used to :
a.) Select the band
b.) Set the AGC
c.) Switch between VFO A and B
d.) To set the VFO to operate in split mode
a.) To change bands, press the MENU button. The bands are listed from 10M to 80M on the top. Tap on the desired band once to switch to it. The zBitx will immediately return to the main screen and the selected band’s frequency will be displayed on the VFO window.
It is possible to “stack” bands on the zBitx. That is, the user can set four different frequencies for different modes, which allows the user quick access to certain frequency and mode.
For example, for the 10M band, the first stack can be set to CW, second for USB, third for FT8, and the fourth for AM.
To do this,
● Press the 10M button once. This will select the first stack and the radio returns to the main screen. Select the desired mode and set the frequency.
● Press the MENU button and press the 10M button again. This will select the second stack. Select a different mode and set the frequency.
● When you press on MENU, you should see ‘2‘ displayed under the selected band this time. Press the 10M button again to select the third stack. Repeat the procedure to set the four stacks.
● Once the four band stacks are set, you can cycle through them by tapping the 10M button. Any changes made to the stack are stored and will be recalled when the stack is selected again later.
b.) To change the automatic gain control, or the AGC, press on it once to select it and rotate the knob, or press the AGC button multiple times. The AGC automatically adjusts the amplification of a signal to maintain a constant level of volume, regardless of the signal strength.
There are four settings – OFF, SLOW, MEDIUM, and FAST. These determine the speed at which the AGC reacts to a change in signal level. When you’re dealing with a loud voice signal, the SLOW setting will help maintain a consistent gain and filter out most background noise that’s much quieter than the main signal. On the other hand, the FAST and MED settings allow for quicker adjustments, making them ideal for scenarios where you want the AGC to closely track the primary signal within the passband. The AGC can be turned OFF for modes such as FT8 where quick changes can cause data loss or when hunting for weak signals on CW.
c.) To switch between VFO A and B, press the VFO button once or press on it and rotate the knob. VFO A and VFO B are two separate tuning controls that enable you to set the receive and transmit frequencies independently. This allows you to switch between two different frequencies quickly. Typically, VFO A is the primary frequency on which you transmit and VFO B is used to listen for replies.
d.) To enable split operation, press the SPLIT button once. The split functions allows you to transmit on one frequency and receive on another. This is very useful when working pileups and allows you to pick out individual stations from multiple calling stations.

2. To select the mode of operation, you can either press the MODE button multiple times, or press it once to highlight it and rotate the knob to select the desired mode. The MODE button is used to select the mode of operation – LSB, USB, 2TONE, DIGITAL, AM, FT8, CW, CWR.
3. The DRIVE function is used to increase or decrease the output power of the zBitx. To change the drive, press the button and turn the main knob. This sets the output power of the zBitx. Lowering the drive value reduces the output power. This is useful when operating QRPp or when connecting to an external amplifier or transverter which require low power input. When the drive is set to zero, the radio doesn’t transmit any signal.
4. The IF is used to set the receiver gain on the zBitx. Press on the IF button and rotate the knob to change it’s value. You can increase the IF gain according to band conditions to hunt for weak signals and lower it to reduce the strength of strong signals. If this is set correctly, the waterfall should look blue with some black spaces interspersed between. If the IF is set too high, the waterfall turns orange.
5. The RIT is used to switch the Receiver Incremental Tuning on or off. To turn on RIT, press the button once. The RIT option is used to fine-tune the received frequency without changing the main operating frequency. This is useful when working signals that are drifting away from the transmit frequency.
6. The AUDIO control is used to set the audio volume of the zBitx. To set the volume, press the AUDIO button and rotate the knob.
5. BW is used to set the bandwidth of the filter. To change the bandwidth, press the BW button and rotate the knob. The user can lower this all the way to 50Hz for modes such as CW and increase it to 5000Hz for modes such as AM or SSB. This allows you to enhance the selectivity, improving the received signal quality, and eliminate interference from other stations.
6. The SPAN control sets the width of the waterfall. To change the SPAN, press the button and rotate the knob or press it multiple times. For digital and CW modes, a span of 10KHz allows you to clearly spot individual signals. For LSB, USB, and AM, a span of 25KHz allows you to see how busy the band is.
These are the basic controls of the radio. By understanding what each control does, you should be able to use the zBitx like any analog radio.