Operating FT8
The FT8 relies on starting the transmission/reception at every 15 second boundary. It is vital that the zBitx Real-time clock is properly synchronized within a second of the UTC. The RTC synchronizes itself using the NTP to within a few milliseconds each time there is Internet connectivity.
To do this, connect a HDMI display, an external keyboard, and mouse to the radio before powering it up. Once the desktop environment loads, select and login to your local WiFi network from the WiFi menu.
To work FT8,
1. Choose the band you wish to operate on by selecting it from the MENU.
2. Switch off the AGC from the MENU.
3. Tune the radio to the FT8 calling frequency for the band.
4. Set the MODE to FT8.
5. Set the BW to 4000. This wide bandwidth setting enables the zBitx to receive almost twice as many signals as a conventional analog radio. It also eliminates the need to use the SPLIT to transmit or receive at greater offset from the base frequency.
6. Set the SPAN to 10KHz.
7. Set the transmit frequency by adjusting the TX PITCH.
8. Listen for a while. You should begin to see messages on the band activity pane on the left of the waterfall.

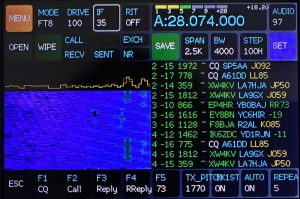
9. To browse through the list of decodes, press on the band activity pane and rotate the main knob to scroll through the band activity. The format of the decoded message is time slot, signal strength, the received signal offset and the text transmitted.
For example the first decode in figure 16 indicates that the transmission occurred during the second time slot, with a signal strength of -15dB at an offset of 1972 Hz with the message CQ SP5AA JO92
10. If you wish to answer a CQ call, select the station calling CQ and press the encoder knob once.
11. If the TX1ST option is enabled, the radio will begin transmitting a CQ during the next even time slot. If this is disabled, it will transmit during the next odd time slot.
12. If the AUTO option is enabled, the zBitx will automatically respond to any replies heard for your callsign. If this is disabled, you will have to manually select the reply from the macros.
13. The REPEAT function sets the number of times the zBitx sends out a message, if no reply is heard. For example, if the REPEAT value is set to 5, the zBitx will send the message five times if no response is heard.
14. If you wish to call CQ, press the CQ macro button and the zBitx begins calling CQ till someone responds to your call. Any responses to your call are shown in white color. If no response is heard, the zBitx will call CQ based on the REPEAT value. If a response is heard and the AUTO setting is enabled, the zBitx will respond to the reply, complete the QSO, and log it.
15. A quick glance at the logger allows you to monitor the progress of a QSO. As the QSO progresses, the zBitx automatically updates the fields on the logger.
16. Pressing the ESC button will halt the transmission and clear the text fields in the logger.